
GenAI App using Proprietery Data, Spring Boot, Amazon Bedrock - Part 3

This is part of a series of articles to introduce Generative AI and step-by-step process with code sample to build GenAI Application; Part-1 (GenAI Introduction), Part-2 (Building GenAI App using Spring Boot and Amazon Bedrock) and Part-3 (Building GenAI App with Proprietary data).

In previous article, we have built GenAI Application (simple ChatBot) using Amazon Bedrock Model (Claude 3 Haiku) and Spring Boot. This App generates answers based on training dataset (public information) of the Model.
What about if we could restrict or refine this Model with proprietary data (like Company details, Sales, Customer records) as add-on Knowledge Base instead of retraining the Model. This would allow to serve personalized and contextual response, e.g. generating response with Customer's last order details. In this article we are going to enhance our GenAI application to accept proprietary data.

Prerequisites

  1. Spring Boot v3, JDK 17
  2. AWS SDK v2.x
  3. AWS IAM account with API credentials and necessary permissions ("AmazonBedRockFullAccess")
  4. Amazon Bedrock with access granted for following Base Models-
    • Claude 3 Haiku by Anthropic (LLM / Response Generation)
    • Embed English by Cohere (Vector Embedding of Proprietary Data)

Let's first understand overall concept and complete Amazon Bedrock Knowledge Base setup process before jumping into code.

Knowledge Base
GenAI includes an architecture concept called "RAG (Retrieval Augmented Generation)" which helps an already trained Model to retrieve contextual information from proprietary dataset and augment the same context into generated response.
To achieve this, we'll extend Amazon Bedrock with Knowledge Base (Proprietary data store) and ask Model to refer this Knowledge Base while generating Response. 

Knowledge Base Setup
This is 2-step workflow process, Data Ingestion and Response Generation.
Step-1: Data Ingestion workflow (Import proprietary data)

  1. Setup Amazon Bedrock Knowledge Base. Refer this article (Don't create Amazon Agent, we'll access this Knowledge Base from Spring Boot App)
  2. Prepare proprietary information (company details, sales records, customer information etc.) which are relevant for your App in supported format (Excel, PDF, Text etc.).
  3. Upload content to staging area (S3 bucket which is configured with Knowledge Base)
  4. Go to Knowledge Base and Sync data store. This would detect changes in S3 bucket and read changed files
  5. Sync process will call Embedding Model (Embed English) to generate Vector Embeddings which are required to store proprietary data in Vector Database.
  6. This Vector Database is going to be used to retrieve contextual information during response generation workflow (Step-2)

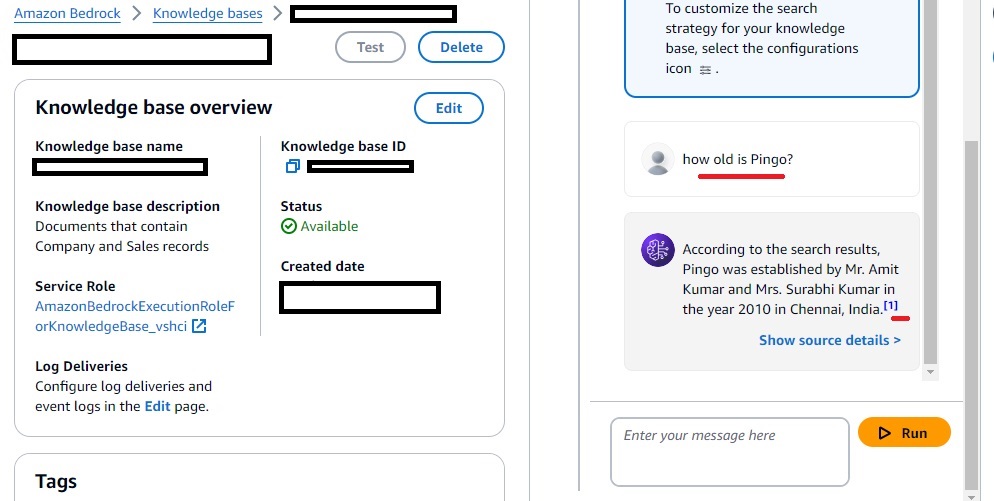
Once Sync (Step-1) is complete, Test Knowledge Base using the Bedrock Console before jumping into code. In the below diagram, Bedrock Console Test (Model: Claude 3 Haiku) answer the query using shared proprietary data (dummy company: Pingo).

Step-2: Response generation workflow (using Knowledge Base and Spring Boot)

Invoke Knowledge Base from Spring Boot App
Now let's look into code changes to invoke Model (along with Knowledge Base) and retrieve contextual response.

Include dependencies for Amazon Bedrock, Bedrock Runtime and Bedrock Agent Runtime in pom.xml

Create Bedrock Agent Runtime Client using your API Credentials and Region

public AwsCredentialsProvider awsCredentialsProvider() {
AwsCredentialsProvider awsCredentialsProvider = StaticCredentialsProvider.create(
AwsBasicCredentials.create(accessKey, secretKey));
return awsCredentialsProvider;
}
@Bean
public BedrockAgentRuntimeClient bedrockAgentRuntime() {
return BedrockAgentRuntimeClient.builder()
.region(Region.of(region))
.credentialsProvider(awsCredentialsProvider())
.build();
}

Compose Request Input, Retrieve and Generate Response

private String invokeModelWithRAG(String query) {
// Config
KnowledgeBaseRetrieveAndGenerateConfiguration kbConfig = KnowledgeBaseRetrieveAndGenerateConfiguration.builder()
.knowledgeBaseId(KNOWLEDGE_BASE_ID)
.modelArn(MODEL_ARN)
.build();
RetrieveAndGenerateConfiguration config = RetrieveAndGenerateConfiguration.builder()
.knowledgeBaseConfiguration(kbConfig)
.type(RetrieveAndGenerateType.KNOWLEDGE_BASE) // If not defined (Error: Invalid input provided)
.build();

// Input
RetrieveAndGenerateInput input = RetrieveAndGenerateInput.builder().text(query).build();

RetrieveAndGenerateRequest request = RetrieveAndGenerateRequest.builder()
.input(input)
.retrieveAndGenerateConfiguration(config)
.build();

// Response from Knowledge Base
RetrieveAndGenerateResponse response = bedrockAgentClient.retrieveAndGenerate(request);
// Response includes output (generated text) and citations (reference to Proprietary content and S3 links)
return response.output().text();
}

Now hit the Chat API on Browser to send query and check generated responses (it should be from your shared proprietary data). Here I'm using a dummy company (Pingo).

This Application source code is shared on GitHub

Comments

Popular posts from this blog

Android Parcelable Example

Few days back I had a requirement to send a ArrayList of my Custom Class Objects through Android Intent , I guess most of you also find this requirement now and then. I never thought it can be that tricky. There are built in functions in Intent to send ArrayList of primitive objects e.g. String, Integer, but when it comes to Custom Data Handling Objects, BOOM … you need to take that extra pain! Android has defined a new light weight IPC ( Inter Process Communication ) data structure called Parcel , where you can flatten your objects in byte stream, same as J2SDK’s Serialization concept. So let’s come back to my original requirement, I had a Data Handling class, which groups together a set of information- public class ParcelData {       int id;       String name;       String desc;       String[] cities = {"suwon", "delhi"}; } I want an ArrayList<ParcelData> of Data Handling objects to be able to pass through Intent . To do that, I can’t use the ParcelData a

Call Control in Android

This tutorial is for those who want to control Phone Call in Android OS. Programmatic approach to Accept or Reject call without user intervention. Kindly note, this approach uses Java Reflection to call methods of an internal class of Android Telephony Framework and might not work with all versions of Android OS. The core concept has been explained in this Android open code . 1st thing 1st, Give the permission . You need to define 3 User Permissions to handle call related functionality- android.permission.READ_PHONE_STATE android.permission.MODIFY_PHONE_STATE (For answerRingingCall() method) android.permission.CALL_PHONE (For endCall() method) Define a Receiver... Create a Receiver which accepts broadcasts with intent action android.intent.action.PHONE_STATE, define following in the Manifest- [receiver android:name=".PhoneCall"]         [intent-filter]             [action android:name="android.intent.action.PHONE_STATE"/]            [/intent-filter] [/receiver] Ha

Android Looper and Toast from WorkerThread

Have you ever tried to launch Android Toast message from worker thread? Probably you are wondering why the heck it is giving this error- java.lang.RuntimeException: Can't create handler inside thread that has not called Looper.prepare() In this article we are going to explore reason behind the above exception and try to understand how Looper works in Android. At the end, I am going to explain one approach to run Toast from a worker thread, but before that we need to understand how Looper works. If you already know in/out of Looper, you can skip below section and directly move to the solution part. Looper is a very basic wrapper class which attach a MessageQueue to a Thread and manage this queue. MessageQueue is a structure to sequentialize simultaneous processing requests of a Thread.  In Android, message/request processing classes like Handler uses Looper to manage their respective MessageQueue. Looper = Thread + MessageQueue Android Looper Life Cycle: As you can see in the abo

Overlay on Android Layout

This will help you to create custom Layout and add Overlay on a LinearLayout. The concept can be reused on other Layout classes i.e. RelativeLayout, FrameLayout etc. I have added a popup Selection Palette, containing "Map Pin" and "List" icons. You can minimize the popup by clicking on the section in Green on the left side bottom corner of the screen.   How can I do that- You need to follow 4 steps- 1. Override LinearLayout Create a Class MyLinearLayout.java which should overwrite LinearLayout 2. Drawing You need to overwrite dispatchDraw (Canvas canvas) method. It gives control to the whole screen. Make sure you set android:layout_height="fill_parent" for the associated layout definition in XML. You can draw anything and anywhere on the canvas. dispatchDraw (Canvas canvas) gets called only after underlying views are drawn, so whatever you draw comes in the foreground.   3. Event Handling You need to overwrite dispatchTouchEvent (MotionEvent e

Android Custom TextView

Have you ever tried to add custom behavior to in-build Android Text View or create custom attributes? If yes, this article is going to help you. Here we'll create Single Custom TextView with support for custom attributes to display First and Last Name in different font and colors. During this process we'll learn following topics- 1. How to override default Views in Android 2. How to define custom Layout Attributes in Android So, Let's get started... Following sections explains necessary changes required in Java code and XML layout files. Create Custom Text View (MyTextView.java) 1. Override Android's default TextView   2. Implement Constructors. If you want custom attributes, override Constructor having Attributes in argument. 3. Override onMeasure(): Calculate required width and height, based on Text Size and selected Font. Once calculation is complete, set updated measure using setMeasuredDimension (reqWidth, reqHeight) Note: It’s really important to define the corr

Google SpreadSheet Library for Android

You might have already tried using Google's GData Lib to access SpreadSheet from Android, and after few hours of try, you start Google for any alternate solution. I have also spent number of hours without any solution. So, I have developed SpreadSheet client Lib [ works on Android :-) ] and ideally work on any Java platform- http://code.google.com/p/google-spreadsheet-lib-android/ Latest version: 2.1 (Added support for List Feed. Please visit above link to get more info.) Supported Features: 1. Create/Delete Spreadsheet 2. List all stored Spreadsheets 3. Add/Delete WorkSheet into/from a given SpreadSheet 4. List all Worksheets of a given Spreadsheet 5. Add Records into WorkSheet/SpreadSheet (It supports Table based record handling) 6. Retrieve Record from WorkSheet/SpreadSheet ( Structured Query support) 7. Retrieve Record as List Feed from Worksheet 8. Update/Delete Records 9. Share ShreadSheet with user/group/domain. 10. Conditional data retrieval-

Android Fragment

Fragment is being hanging out since Andriod 3.0, but with the release of 4.0, it has become an obvious choice for Android Application development for both Tabs and Smart phones. Few people think, fragment is a " Superman " which can add any kind of UI layout/style/decoration. But that is not true, rather than being an UI layout or decoration enhancer, Fragment is a very important concept to manage segments of your UI component code base . Prior to Fragment, developers were able manage UI flow only at the Activity level. All UI components were Views (mentioned in XML layout and part of Activity) and there was no way to manage these components separately. As a result all view management code were in a single file i.e. Activity class. With fragment approach, we can now remove View management code from Activity and place them in their respective Java classes. So, a pretty neat approach for code management. Here I'll explain various concepts of Fragment with an example appli

HashMap Internal

I always wanted to implement the logic behind the famous data structure of Java , HashMap and here it comes. Though it’s not the complete implementation considering all optimization scenarios, but it will highlight the basic algorithm behind the HashMap . So let’s start, this implementation will use my LinkedList implementation (Reason: for this implementation I thought to write everything from the scratch apart from primitive data types. Sounds weird? May be ;-) ). You may refer my earlier post on LinkedList , as I’m going to use it. HashMap is a key-value pair data structure, where you retrieve value by passing key. To optimize the search of key, a concept of Bucket (an Array of Java Objects) has been introduced. This is used, so that if search hits this Bucket , corresponding value element is instantly retrieved, otherwise it iterates sequentially through the Linked List associated with each Bucket element. So you can say if all HashMap elements get fit into the Bucket, retrieving

Accessing Yahoo Finance API

Since last few days I was wondering the right set of Web Service to read Country wise Stock Exchange index information . I found a bunch of scattered information, but no straight forward answer. It seems there are not many "reliable" and "flexible" options and Yahoo Finance is one of the top of this class. Though Yahoo Finance is very powerful, some how its very less documented and it seems Yahoo doesn't care much about this wonderful web service and expect Developers to do some kind of "hacking". The only online resource that I (and most of you as well ) found is one 3rd party web site- http://www.gummy-stuff.org/Yahoo-data.htm and it seems they know much more than what Yahoo dose..;-) Anyway let me continue and share my experience and information to help budding developer who wants to use Yahoo Finance Web Service in their Mobile, Web o r Desktop s olution. There are 2 set of APIs to access Yahoo Finance details- YQL based Web Service : Th

Eclipse EGIT, Download Code, Attach Framework code & Debug

This article explains procedure to download Android source (few important Apps and Framework base code) using Eclipse EGit plugin and then attach framework code to debug important framework classes (e.g. Activity etc.). Install EGit Download Source from GIT Repository Attach Framework code Debug Download EGit Plug-in EGit is a GIT plugin for Eclipse which helps to mange GIT clone, Check-ins, Sync etc. from your Eclipse workspace. Eclipse (Version: 3.7.x) -> Help -> Install New Software -> "Add" - " http://download.eclipse.org/egit/updates ". Once the plug-in installation is successful, you'll find a new Eclipse View perspective- "Git Repository Exploring"    Download Android source To download code from Android GIT repository, we need to create "local Git clone". Each local clone is associated with Remote Clone URL.   https://android.googlesource.com/ lists Git Repository URLs for different sections of An